| Fuel tanks [message #278250] |
Sat, 23 May 2015 15:54  |
 bpimm
bpimm

Messages: 211
Registered: June 2013
Location: Washougal Washington
Karma: 2
|
Senior Member |
|
|
I was in the process of redoing the fuel system, adding in tank electric pumps and replacing all the fuel and vent lines. I had a local radiator shop clean the tanks, they cut panels out so they can sandblast the inside then reassemble the tanks and put a sealer on the inside. The first time they turned out good, the sender/pump assemblies fit tight but OK. Before I reassembled them I took a light to the inside and found a couple areas that hadn't been sealed and had started rusting already, when I talked to them they took responsibility and said they would redo them, 3 weeks later I get them back and they look rough, lots of evidence of warpage and hammer work to try to correct it, I wasn't very happy to see this but decided to move on with the project. I went to put the fuel sender/pump assemblies in and the tanks are now 3/4" thinner than they were and the sender/pump assemblies no longer fit. Of course they don't have anybody to talk to on Saturday so I have to wait until Tuesday to even talk to them and the plan was to be leaving in the MH Friday.... Ain't gonna happen now! Great way to start the holiday weekend.
Anybody have a good set of tanks that are ready to go? preferably in SW Washington? HA... like that's going to happen.
Any ideas for expanding the tanks back to their original size, I thought about sealing them and pumping them up until they expanded but that seams likely to end up with balloons. 
Call me Grumpy.
Brian & RaeDean
1973 26' #383
Washougal WA
|
|
|
|
| Re: Fuel tanks [message #278294 is a reply to message #278250] |
Sun, 24 May 2015 13:28  |
petemosss
Messages: 221
Registered: August 2008
Location: Jacksonville, Florida
Karma: 0
|
Senior Member |
|
|
Goodluck, I'm still looking for a rear tank.
Pete
74 Canyon Lands 26' "Emery"
|
|
|
|
| Re: Fuel tanks [message #278296 is a reply to message #278250] |
Sun, 24 May 2015 13:44 |
 |
Matt Colie
Messages: 8547
Registered: March 2007
Location: S.E. Michigan
Karma: 7
|
Senior Member |
|
|
Brian,
Low pressure air will do it.
When I was doing all my fuel work, I put just a few PSI in the tanks to pressure test them because I was very tired of having them down. I don't actually know how high a pressure I used, but when I looked back that the tank once, I jumped to get the pressure off it as it was WAY bigger than it was supposed to be.
Matt
bpimm wrote on Sat, 23 May 2015 16:54I was in the process of redoing the fuel system, adding in tank electric pumps and replacing all the fuel and vent lines. I had a local radiator shop clean the tanks, they cut panels out so they can sandblast the inside then reassemble the tanks and put a sealer on the inside. The first time they turned out good, the sender/pump assemblies fit tight but OK. Before I reassembled them I took a light to the inside and found a couple areas that hadn't been sealed and had started rusting already, when I talked to them they took responsibility and said they would redo them, 3 weeks later I get them back and they look rough, lots of evidence of warpage and hammer work to try to correct it, I wasn't very happy to see this but decided to move on with the project. I went to put the fuel sender/pump assemblies in and the tanks are now 3/4" thinner than they were and the sender/pump assemblies no longer fit. Of course they don't have anybody to talk to on Saturday so I have to wait until Tuesday to even talk to them and the plan was to be leaving in the MH Friday.... Ain't gonna happen now! Great way to start the holiday weekend.
Anybody have a good set of tanks that are ready to go? preferably in SW Washington? HA... like that's going to happen.
Any ideas for expanding the tanks back to their original size, I thought about sealing them and pumping them up until they expanded but that seams likely to end up with balloons.
Call me Grumpy.
Matt & Mary Colie - Chaumière -'73 Glacier 23 - Members GMCMI, GMCGL, GMCES
Electronically Controlled Quiet Engine Cooling Fan with OE Rear Drum Brakes with Applied Control Arms
SE Michigan - Near DTW - Twixt A2 and Detroit
|
|
|
|
|
|
| Re: Fuel tanks [message #278308 is a reply to message #278296] |
Sun, 24 May 2015 16:12 |
bpimm
Messages: 211
Registered: June 2013
Location: Washougal Washington
Karma: 2
|
Senior Member |
|
|
Matt Colie wrote on Sun, 24 May 2015 11:44Brian,
Low pressure air will do it.
When I was doing all my fuel work, I put just a few PSI in the tanks to pressure test them because I was very tired of having them down. I don't actually know how high a pressure I used, but when I looked back that the tank once, I jumped to get the pressure off it as it was WAY bigger than it was supposed to be.
Matt
I'm actually thinking of using water pressure instead of air, I could control the expansion much easier that way. I would have to make plates to replace the senders with a fitting to add the water.
I'm going to wait until I can talk to the shop that did this and see what their solution is before I do anything else. Maybe they will buy me a pair of new stainless tanks HAHAHA.
Brian & RaeDean
1973 26' #383
Washougal WA
|
|
|
|
| Re: Fuel tanks [message #278310 is a reply to message #278296] |
Sun, 24 May 2015 16:59 |
midlf
Messages: 2212
Registered: July 2007
Location: SE Wisc. (Palmyra)
Karma: 1
|
Senior Member |
|
|
The rating seems to be 2PSI. At 3psi the sender seal will start to leak. 4psi gets scary. Do the math. It comes out to approx 4.5 TONS of force trying to push the tank halves apart. That amounts to about 60 pounds per inch force on the seams.
If you do not have a low pressure regulator and gauge you can make one using a piece of 4" PVC pipe and a pipe cap. Put a T in the air line to your tank. Connect suitable hose or tube to the T. Stand the 4" pipe on end and fill with water. Put the tube into the water to the depth that corresponds to the pressure you want. 1 PSI = 2.31 feet. Slowly bleed air into your tank until it bubbles out of the pipe. Adjust depth to obtain the pressure you want. It's a bit clunky but accurate and cheap.
I would not use water. You will have the devils own time trying to get the water out and the tank dry.
I always recommend chemical rust stripping as the tank does not have to be cut like it does if you sand blast. Around here I had mine done for about $100. Then I used the POR gas tank product to coat the interior. I used Chassis Saver on the exterior.
Steve Southworth
1974 Glacier TZE064V100150 (for workin on)
1975 Transmode TZE365V100394 (parts & spares)
Palmyra WI
|
|
|
|
|
|
| Re: Fuel tanks [message #278377 is a reply to message #278310] |
Mon, 25 May 2015 12:52 |
bpimm
Messages: 211
Registered: June 2013
Location: Washougal Washington
Karma: 2
|
Senior Member |
|
|
midlf wrote on Sun, 24 May 2015 14:59The rating seems to be 2PSI. At 3psi the sender seal will start to leak. 4psi gets scary. Do the math. It comes out to approx 4.5 TONS of force trying to push the tank halves apart. That amounts to about 60 pounds per inch force on the seams.
If you do not have a low pressure regulator and gauge you can make one using a piece of 4" PVC pipe and a pipe cap. Put a T in the air line to your tank. Connect suitable hose or tube to the T. Stand the 4" pipe on end and fill with water. Put the tube into the water to the depth that corresponds to the pressure you want. 1 PSI = 2.31 feet. Slowly bleed air into your tank until it bubbles out of the pipe. Adjust depth to obtain the pressure you want. It's a bit clunky but accurate and cheap.
I would not use water. You will have the devils own time trying to get the water out and the tank dry.
I always recommend chemical rust stripping as the tank does not have to be cut like it does if you sand blast. Around here I had mine done for about $100. Then I used the POR gas tank product to coat the interior. I used Chassis Saver on the exterior.
I first looked into chemical stripping but the stripping place said if it had heavy rust, which mine did, that they couldn't guarantee that it would get it all, so I opted for the sandblast. at this point it doesn't look like that was the right decision. They added a corner drain to the tanks so I don't think it would be that hard to get them dry again and the water would work like a hydraulic ram pushing the tank walls apart with less possibility of over expanding like a compressible gas could.
This morning I noticed another problem, the outlet for the vapor separator on one of the tanks is pointed up at a 45 degree angle so there is no way to get a compression fitting on it for the hard line without holding the tank down from the floor so they moved that fitting so it won't work either.
I think tomorrows conversation with them is going to be interesting.
Brian & RaeDean
1973 26' #383
Washougal WA
|
|
|
|
| Re: Fuel tanks [message #278382 is a reply to message #278310] |
Mon, 25 May 2015 13:56 |
Adrien G.
Messages: 474
Registered: May 2008
Location: Burns Flat, OK 73624
Karma: 1
|
Senior Member |
|
|
Steve,
" I always recommend chemical rust stripping as the tank does not have to be cut like it does if you sand blast. Around here I had mine done for about $100. Then I used the POR gas tank product to coat the interior. I used Chassis Saver on the exterior. "
I thought of using POR to coat my tanks. The challenge that I couldn't overcome was in being sure it's all coated in the baffled areas.
When you did your tanks, how did you insure complete coverage in the baffled areas? I'd still would like to do it.
Thanks.
Adrien & Jenny Genesoto
75 Glenbrook (26-3) Mods LS3.70 FD / Reaction Sys / 80mm Front&Intermidiate / Hydroboost / 16" Tires / Frame Rebuild / Interior Rebuild
Yuba City,Ca. Text 530-nine-3-three-3-nine-nine-6
|
|
|
|
| Re: Fuel tanks [message #278383 is a reply to message #278250] |
Mon, 25 May 2015 14:07 |
roy1
Messages: 2126
Registered: July 2004
Location: Minden nevada
Karma: 6
|
Senior Member |
|
|
When I pressure tested my tanks I used the discharge pressure from my shop vac so I wouldn't over pressurize them.
Roy Keen
Minden,NV
76 X Glenbrook
|
|
|
|
| Re: Fuel tanks [message #278385 is a reply to message #278382] |
Mon, 25 May 2015 15:14 |
midlf
Messages: 2212
Registered: July 2007
Location: SE Wisc. (Palmyra)
Karma: 1
|
Senior Member |
|
|
Adrien G. wrote on Mon, 25 May 2015 13:56Steve,
" I always recommend chemical rust stripping as the tank does not have to be cut like it does if you sand blast. Around here I had mine done for about $100. Then I used the POR gas tank product to coat the interior. I used Chassis Saver on the exterior. "
I thought of using POR to coat my tanks. The challenge that I couldn't overcome was in being sure it's all coated in the baffled areas.
When you did your tanks, how did you insure complete coverage in the baffled areas? I'd still would like to do it.
Thanks.
The baffles are quite open. They are spot welded to the upper half. They also have holes in them and clearance to the tank at the bottom, sides and top. As our tanks are larger than standard I bought the POR-15 prep products by the gallon and used two quarts of the sealer. I had one relitivly clean tank and one very rusty tank. The very rusty tank was sent out for chemical stripping. The clean one was not. I went through POR's steps for each tank.
All openings were sealedI put each product in the tank and turned it over and over and side to side, a lot. I pictured the 6 sides inside the tank and made sure the liquid was well sloshed onto each side. I used 2X4's to make handling it easier. See my photo album:
http://www.gmcmhphotos.com/photos/g5564-gas-tank-rework.html
I did both tanks at the same time and had, with 2 quarts, enough to do both tanks. It is very important to get the tanks dry after each step.
After it was all done I used a light and mirror to look around inside and every thing I could see was well coated. I have no concerns that there were any gaps.
Here is a photo site album of the process being done by guys in lab coats:
http://www.gmcmhphotos.com/photos/g3555-fuel-tank-sloshing.html
Steve Southworth
1974 Glacier TZE064V100150 (for workin on)
1975 Transmode TZE365V100394 (parts & spares)
Palmyra WI
|
|
|
|
|
|
| Re: Fuel tanks [message #278433 is a reply to message #278424] |
Tue, 26 May 2015 09:20 |
bpimm
Messages: 211
Registered: June 2013
Location: Washougal Washington
Karma: 2
|
Senior Member |
|
|
One of my tanks had at least 5 gallons of water in it when I got it, that's where the rust came from. I'm sure it sat empty for quite a while. Also why I'm replacing/repairing everything in the system as there could be a way for water to get in to get that much in the tank. I haven't found a path yet so maybe someone let it sit with the cap off. The amazing thing is I drove it home 80 miles that way.
Brian & RaeDean
1973 26' #383
Washougal WA
|
|
|
|
| Re: Fuel tanks [message #278507 is a reply to message #278250] |
Wed, 27 May 2015 08:59 |
bpimm
Messages: 211
Registered: June 2013
Location: Washougal Washington
Karma: 2
|
Senior Member |
|
|
The shop has them back and are going to "fix them", I left a sender/pump unit with them so we'll see.
Brian & RaeDean
1973 26' #383
Washougal WA
|
|
|
|
| Re: Fuel tanks [message #281999 is a reply to message #278250] |
Mon, 13 July 2015 11:22 |
bpimm
Messages: 211
Registered: June 2013
Location: Washougal Washington
Karma: 2
|
Senior Member |
|
|
Been a while since I posted on this subject, The final result with the tanks is I think they will work, they cut them open again and called me to come over and look at them, Much arguing and discussion about physics omitted, I suggested that they add 4 spacers to the bottom of the baffles to hold the bottom of the tank in place and they agreed to do that. Finally got the tanks back and installed with all hard lines on top of the tank. One of the problems I was having was a gas smell in the cabin when i filled the tanks and gas dripping from the vent line under the floor when I filled the tanks, when I removed the side panel in the cab, another PO story... stapled the carpet down through the side panel flange at the floor. ARGG..., I found the source of the smell, I think, it has a rubber coupler inside the cab on the fill tube and the vent is rubber. Not how it's going back together.
I had a problem with the fit of the new style fuel nozzles fitting into the fill neck as others have mentioned as well so I decided to fix that also.
I added about a 20 Degree bend into the filler neck. Just happened to have the right size Ubend laying around.
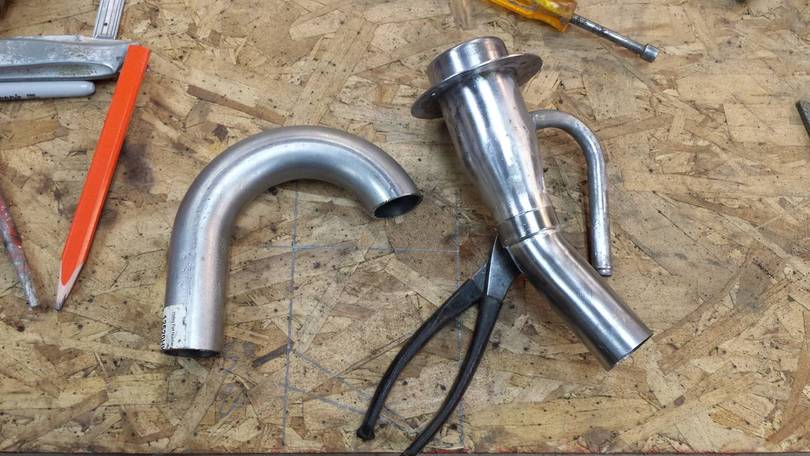
I also lengthened the vent to go through the floor as well.

To make this work I had to change the angle of the bottom of the recess that it mounts to as well. I cut out the bottom and a wedge to slope the bottom outwards to allow better access for the new nozzles. I'll find out if it works first time I go to fill it up. (Fingers crossed)


Looks like it should clear.


I also ran seperate vent lines from the tanks so maybe now it will fill better. I feel better with no rubber in the passenger compartment.

Now I just need to get it wired up and tested. Here is what I'm planning to do.

This should give me the safety of the inertia switch and a turn on prime pulse but the pump won't keep running if the engine is off with the ignition on.
Brian & RaeDean
1973 26' #383
Washougal WA
|
|
|
|
|
|
|
|
 GMCforum


