Home » Public Forums » GMCnet » Painting the cockpit ceiling
|
|
| Re: [GMCnet] Painting the cockpit ceiling [message #261472 is a reply to message #261459] |
Wed, 10 September 2014 06:09   |
 Jim at the Co-op

Messages: 291
Registered: May 2014
Location: Orlando Florida
Karma: 2
|
Senior Member |
|
|
Yep, you got it. Clasco and the restoration folks back in the day would
stretch automotive headliner material on it but we found it released after
time from the plastic. I switched to dropping the caps , repairing them
and dying them with the flexible vinyl dye.
With the visors down, I usually cut 1 ring from the spring on the visor
mount to help putting them back in. You can also double seal the top
clearance lights from the inside as well as any other penetration. The top
clearance lights use "bullet" connectors and the wires are short, you could
spike that gun and lengthen the wires. There is an overlay seam at the top
of the windshields on each side, you could drip a liquid sealant down that
crack, this is a main point for a windshield water leak. Using that epoxy
on the back of the ABS cap was good, you could also use PVC/ABS glue --
actually we use the epoxy. If you are considering a new windshield drape,
you could locate the I beam track when you put the cap back in. Instead of
using that original aluminum trim, use the new stuff. If the cracks show
at the front, we will create an overlay panel in that front area and cover
it with the color keyed vinyl. With the speaker/light panels down, you
know those speakers can't be spring chickens-- 3.5" dual cone speakers are
cheap-- like $8 each, replacing those and installing a $9 bullet light to
direct the light right at your lap instead of illuminating the front area
and blinding you in the dark, I use the original 2 position switch to give
a speaker cut off switch. hey, the copilot may want to read instead of
listening to the ball game at full blast! You can also easily route 12
volts and ground up to the rear view mirror for maybe fans, an
electric compass or wiring for some other thing. Just running a pull wire
for the future is worth doing.
See, dropping that front cap gives you all sorts of options and makes the
project so much ore effective. When talking about doing projects on the
interior, I always look for additions things the labor will afford me to
do. Makes the work more cost effective getting other things done using the
same labor costs.
Good job, just wanted to add this in case someone decided to do what you
did,
Jim Bounds
-------------------------
On Tue, Sep 9, 2014 at 11:15 PM, Kerry Pinkerton
wrote:
> Just couldn't let that old yellowed plastic stay with the pretty new white
> vinyl headliner so out it came.
>
> Pretty easy really. Remove the sunvisors and all the screws around the
> glass and the front drops down and slides off an extrusion at the back and
> all
> of a sudden it's in your hands.
>
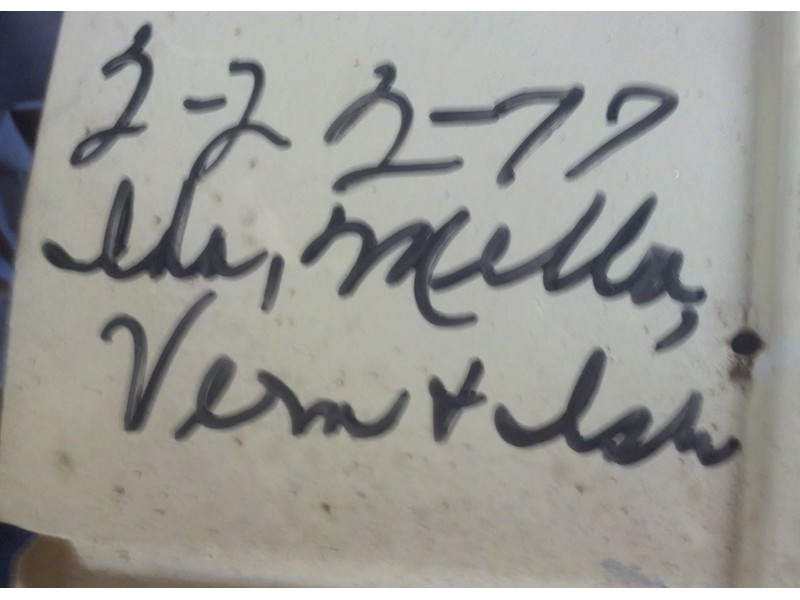
> When I got it on a workbench I was surprised to find the names of the four
> ladies who worked on it and the date. Thanks Ida, Mella, Vern, and ???. I
> had to sign and date it also. Some PO will wonder who all these people
> are. It's interesting to know that the coach was assembled in late
> February,
> 1977.
>
>
> http://www.gmcmhphotos.com/photos/new-cabinets-interior-mods/p55848-painting-interior-fron.html
>
>
> I fixed a bunch of cracks and holes with 3M panel bonding adhesive. Over
> the big cracks, I bedded some fiberglas.
>
>
> http://www.gmcmhphotos.com/photos/new-cabinets-interior-mods/p55849-painting-interior-front-cap.html
>
>
> Some plastic rattle can paint and:
>
>
> http://www.gmcmhphotos.com/photos/new-cabinets-interior-mods/p55850-painting-interior-front-cap.html
>
>
> It took longer to put it back than take it out.
>
>
> http://www.gmcmhphotos.com/photos/new-cabinets-interior-mods/p55852-painting-interior-front-cap.html
>
>
> Getting the sunvisors threads started was the challenge and the spring
> makes tightening it a bit of a paint but nothing that hard.
>
>
> http://www.gmcmhphotos.com/photos/new-cabinets-interior-mods/p55853-painting-interior-front-cap.html
>
>
> The difference in the look is amazing. This whole project took about 6
> hours if you don't count paint drying time. I took it out one afternoon and
> put it back the next.
> --
> Kerry Pinkerton
>
> North Alabama, near Huntsville,
>
> 77 Eleganza II, "The Lady", 403CI, Manny Brakes, 1 ton, tranny also a 76
> Eleganza to be re-bodied as an Art Deco car hauler
> _______________________________________________
> GMCnet mailing list
> Unsubscribe or Change List Options:
> http://temp.gmcnet.org/cgi-bin/mailman/listinfo/gmclist
>
_______________________________________________
GMCnet mailing list
Unsubscribe or Change List Options:
http://temp.gmcnet.org/cgi-bin/mailman/listinfo/gmclist
|
|
|
|
| Re: [GMCnet] Painting the cockpit ceiling [message #261482 is a reply to message #261472] |
Wed, 10 September 2014 08:57 |
tphipps
Messages: 3005
Registered: August 2004
Location: Spanish Fort, AL
Karma: 9
|
Senior Member |
|
|
Excellent job, Kerry. As usual, another idea added to the list. And, Jim, thanks for your additional comments. Maybe I can get this done before Savannah.
Tom, MS II
2012 Phoenix Cruiser model 2552
KA4CSG
|
|
|
|
| Re: [GMCnet] Painting the cockpit ceiling [message #261483 is a reply to message #261482] |
Wed, 10 September 2014 09:09 |
Daniel DeLuca
Messages: 120
Registered: June 2014
Karma: 0
|
Senior Member |
|
|
One additional note, while certainly the “wrong” way it is possible to paint these in place and get decent results. I generally avoid taking apart the plastic bits of the coach if I can.
Dan
78 Eleganza
On Sep 10, 2014, at 9:57 AM, Thomas Phipps wrote:
> Excellent job, Kerry. As usual, another idea added to the list. And, Jim, thanks for your additional comments. Maybe I can get this done before
> Savannah.
> Tom, MS II
> --
> 1975 GMC Avion
> _______________________________________________
> GMCnet mailing list
> Unsubscribe or Change List Options:
> http://temp.gmcnet.org/cgi-bin/mailman/listinfo/gmclist
_______________________________________________
GMCnet mailing list
Unsubscribe or Change List Options:
http://temp.gmcnet.org/cgi-bin/mailman/listinfo/gmclist
|
|
|
|
| Re: [GMCnet] Painting the cockpit ceiling [message #261494 is a reply to message #261483] |
Wed, 10 September 2014 12:10 |
kerry pinkerton
Messages: 2565
Registered: July 2012
Location: Harvest, Al
Karma: 15
|
Senior Member |
|
|
Daniel DeLuca wrote on Wed, 10 September 2014 09:09One additional note, while certainly the "wrong" way it is possible to paint these in place and get decent results. I generally avoid taking apart the plastic bits of the coach if I can. ...
I hear you Dan but while the headliner and new cabinets were out it was actually easier to take them out than try to deal with them in place and mask off everything while trying not to suffocate myself while spraying. In addition, it would be difficult to repair the cracks without getting to the back side for reinforcement. I had 3-4 cracks that were pretty serious.
I also moved the certain track back 3" so the clear shower curtain behind the seats doesn't rub on our hair anymore.
Kerry Pinkerton - North Alabama
Had 5 over the years. Currently have a '06 Fleetwood Discovery 39L
|
|
|
|
| Re: Painting the cockpit ceiling [message #261506 is a reply to message #261459] |
Wed, 10 September 2014 15:24 |
Chris Tyler
Messages: 458
Registered: September 2013
Location: Odessa FL
Karma: 7
|
Senior Member |
|
|
A bit off topic, but do you [or anyone] have pics of the roof with the panel off?
Considering installing a sunroof that I have where there is a sealed crack in the outside roof, and would like to know what is up there before I go any further.
Nice work!
76 Glenbrook
|
|
|
|
| Re: Painting the cockpit ceiling [message #261510 is a reply to message #261459] |
Wed, 10 September 2014 15:49 |
kerry pinkerton
Messages: 2565
Registered: July 2012
Location: Harvest, Al
Karma: 15
|
Senior Member |
|
|
I did not take any Chris. Sorry. I'd have been glad to but it ain't coming down again in my lifetime I hope.
Regarding the sunroof, before you get too carried away, make sure it has the right curves side to side and front to rear. The fiberglas cap is NOT a flat panel in that area and if your sunroof doesn't match the profile pretty well, imo you'll have a devil of a time getting it to seal and look right.
Kerry Pinkerton - North Alabama
Had 5 over the years. Currently have a '06 Fleetwood Discovery 39L
|
|
|
|
|
|
Goto Forum:
Current Time: Tue Jan 14 16:39:45 CST 2025
Total time taken to generate the page: 0.01399 seconds
|
 GMCforum