Home » Public Forums » GMCnet » On road soon!
| On road soon! [message #236824] |
Mon, 20 January 2014 20:11  |
 |
WildBill

Messages: 232
Registered: January 2014
Karma: 1
|
Senior Member |
|
|
New owner, always liked them. Neighbour across the park bought one last summer, did some work for him getting it ready for the road. Bought an acreage on the south end of Vancouver island and need a place to stay while we clear it for a house and shop and something to get away from the workload. In the last week and a half it is gutted and rear floor removed, ((I do have a full time job too).
CALGARY dude on here was thinking about buying it a couple years ago. More water damage than when hew saw it last but I hooked up fuel line to tanks, filled gas and sea foam, hooked up the disconnected rear updated lenses, checked pressures and levels and drove through the night to get back to Edmonton. 403 ran good but would like bigger, some Caddys around and 455's. Rear floor removed, don't know if I'm going to replace that and put a layer over top or just pull off all the floor and replace. Thinking hydronic heating, while driving, instantaneous hwh. Queen bed at the back. Gotta tape up roof while I do interior repairs over winter and seal up roof in spring. Bought a c class $400 for steel rims, new Michelins. Se what else I can use and park on lake with crap rubber.
Really need a passenger side door panel. Gone, will make something if necessary but.. By the way$1000 cdn
Thanks , happy to be a new member!
[Updated on: Sun, 06 April 2014 00:39] Report message to a moderator |
|
|
|
|
|
| Re: [GMCnet] TZE167V102169 on road soon! [message #240817 is a reply to message #240813] |
Fri, 21 February 2014 21:28  |
 |
 USAussie

Messages: 15912
Registered: July 2007
Location: Sydney, Australia
Karma: 6
|
Senior Member |
|
|
Bill.
This is all very interesting; however, photos would make it much more helpful to others.
Regards,
Rob M.
Sydney, Australia
AUS '75 Avion - The Blue Streak TZE365V100428
USA '75 Avion - Double Trouble TZE365V100426
-----Original Message-----
From: Bill Dolinsky
May as well bring this post back my other post turned into a miscellaneous engine rambling thread so.
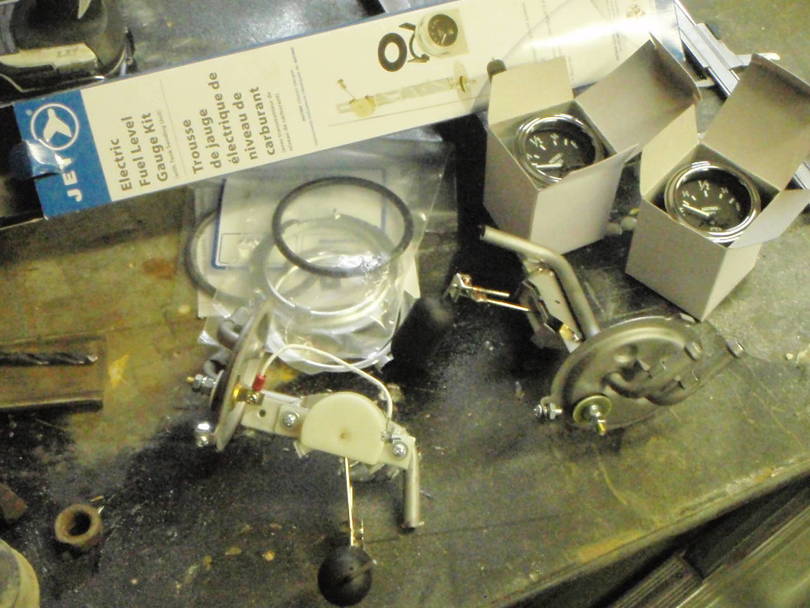
Read about the fuel tank issue and not really knowing if there was fuel in one tank or the other depending on the motorhomes
attitude so decided 2 live gauges would be great as well as original sending units were spotty, you could put side pressure on arm
and lose continuity. Probably could have put more tension on the contact but didn't trust the resistance wire integrity and didn't
really want to spend $200 each for new reproduction senders. We have had good luck at work with these Hastings gauge and sender sets
packaged by Jet, about $45 each. Not compatible with the factory gauge as they are 240-33 ohms and GM is 0-90 however I wanted 2
live gauges because of fuel transferring between tanks and didn't want to have to switch to find out how much fuel I had left and
find a empty tank and starve the engine of gas. I also have to watch my budget and $200 each was out of it.
I removed the socks and the sender parts. the replacement is the exact same size but opposite so I took the sender apart from the
attach bracket and located the pivot hole in the same location as the original. 4 tacs with the mig and reassembled the gauge. Float
rod has to be pretty short so I cut the rod to remove the float so I could have the float tighter in to the jam nut and bent rods as
needed. Miged that rod as well as red loctite on jam nut and attachment hardware so it cant come loose. Original connector looked
dodgey so went with the stud, a little die grinder work and seal modification and epoxy for good measure. Works for me! Hope I have
room for all the gauges..
Working on it the other day and an airbag blew, loud. That could be dangerous if you were under it. Jack stands are your friend!
Bill
_______________________________________________
GMCnet mailing list
Unsubscribe or Change List Options:
http://temp.gmcnet.org/cgi-bin/mailman/listinfo/gmclist
Regards,
Rob M. (USAussie)
The Pedantic Mechanic
Sydney, Australia
'75 Avion - AUS - The Blue Streak TZE365V100428
'75 Avion - USA - Double Trouble TZE365V100426
|
|
|
|
|
|
|
|
| Re: TZE167V102169 on road soon! [message #240827 is a reply to message #236824] |
Fri, 21 February 2014 23:49 |
appie

Messages: 902
Registered: April 2013
Location: denmark
Karma: 2
|
Senior Member |
|
|
Bill
From my experience:
It is so much easier to find leak while the interior is out
Make sure it is waterproof ( roof and windows) before you do the interior.
Taking out all side windows is quite easy and those 40 years old seals are not holding the water out anymore.
I am fighting my last leak and will have to take the rear sealing out ( bummer) just cant find that leak
Appie
eleganza 76 "Olga" now sadly sold
6 wheel discbrake
Quadrabags
Springfield stage 2 462 olds
Manny tranny
( pictures at http://www.gmcmhphotos.com/photos/g6489-olga.html
Fulltiming in Europe july 2014 til july 2016
Denmark
|
|
|
|
| Re: TZE167V102169 on road soon! [message #240852 is a reply to message #240827] |
Sat, 22 February 2014 11:56 |
cbryan
Messages: 451
Registered: May 2012
Location: Ennis, Texas
Karma: 3
|
Senior Member |
|
|
Bill,
Are you going to put a sock on the pickup? I found by experience that my replacement sender-pickup-locking ring setup takes gas about an inch and a half off the floor of the tank. Running out of gas at 1/4 indicated is a very surprising event.
I really like your work, I had never thought of having two gauges to explain the comings and goings of fuel. I think I may go to two gauges now, and combine my air pressure gauges into a double needle one, making room for the second fuel tank gauge. I have a custom instrument panel. Nothing exactly like it in the world, I'll bet.
I asked about the sock because I am thinking of leaving mine off when I R&R the next time. I have a prefilter, and a post filter. Prefilter is spin-on about the size of the oil filter. It ought to catch anything a sock would, and when I change it, out goes the debris.
Carey
Carey from Ennis, Texas
78 Royale, 500 Cadillac, Rance Baxter EFI.
|
|
|
|
| Re: TZE167V102169 on road soon! [message #240877 is a reply to message #236824] |
Sat, 22 February 2014 16:08 |
|
WildBill
Messages: 232
Registered: January 2014
Karma: 1
|
Senior Member |
|
|
Sending unit number is HTA1117 ,Hastings is a division of Jet. I think probably anyone but Napa sells but they might too. Not going to run socks and the pickup tube is adjusted to about 1/8" from the bottom of tank. Going to the fuel switch next then large spin on marine filter and then to Carter vane fuel pump. I also have a return to tank regulator I'm going to mount up front and run back to probably the rear tank so rear tank always full for going up mountains and will have lots of filtering action going on with the circulation. This particular fuel pump was on my airboat and the internal fuel pressure regulator messed up and was putting out 16 psi, instead of buying another 7 psi pump I just put a FPR on it.
Fixing all the leaks prior to interior doesn't fit with my timeframe, wish it did. Winter here and I can't do roof till it warms up and can't put everything on hold till summer.
I have Monday to Thursday off, finish fuel system, wire fuel system, air lines roughed in, I'm building sturdier mounts between chassis and frame, not bolted through plywood. Welding in additional 1x2 aluminum tube above original frame tabs and will drill and fully isolate the two. Some aluminum sheets need to be modified and built, and cut and fit insulation. Hopefully by Thursday I can be at least start cutting plywood.
Also need to fix my exhaust. The 2 1/2 to the back is good but rest is not. Picked up new walker ball flanges and am just going to build a y pipe to it with no mufflers at the front. I'll add something to the rear for a muffler if it's to noisy.
Black /grey water tank coming along, need to cloth the interior and glue it together yet.
Sulley type airbag kit in the works, material all cut, bags ordered.
I should add the Hastings gauges look indistinguishable from Stewart Warner deluxe series gauges other than the Hastings logo.
[Updated on: Sat, 22 February 2014 18:52] Report message to a moderator |
|
|
|
| Re: [GMCnet] TZE167V102169 on road soon! [message #240919 is a reply to message #240877] |
Sat, 22 February 2014 21:31 |
|
USAussie
Messages: 15912
Registered: July 2007
Location: Sydney, Australia
Karma: 6
|
Senior Member |
|
|
Bill,
Re the senders: Thanks!
Re the leaks: The ceiling is completely separate from the wall panels so you could remove the upper cupboards, do whatever you want
/ need to them and make all the panels for the interior ceiling and set all that aside until you can get to the roof. If all the
ceiling panels and cabinets are ready to go it shouldn't take more than a couple of days to install them - I THINK! ;-)
Re the exhaust: It has been noted here before that not having mufflers is not a problem for those in the GMC; however, it's not nice
for people outside the coach.
Regards,
Rob M.
Sydney, Australia
AUS '75 Avion - The Blue Streak TZE365V100428
USA '75 Avion - Double Trouble TZE365V100426
-----Original Message-----
From: gmclist-bounces@temp.gmcnet.org [mailto:gmclist-bounces@temp.gmcnet.org] On Behalf Of Bill Dolinsky
Sending unit number is HTA1117 ,Hastings is a division of Jet. I think probably anyone but Napa sells but they might too. Not going
to run socks and the pickup tube is adjusted to about 1/8" from the bottom of tank. Going to the fuel switch next then large spin on
marine filter and then to Carter vane fuel pump. I also have a return to tank regulator I'm going to mount up front and run back to
probably the rear tank so rear tank always full for going up mountains and will have lots of filtering action going on with the
circulation. This particular fuel pump was on my airboat and the internal fuel pressure regulator messed up and was putting out 16
psi, instead of buying another 7 psi pump I just put a FPR on it.
Fixing all the leaks prior to interior doesn't fit with my timeframe, wish it did. Winter here and I can't do roof till it warms up
and can't put everything on hold till summer.
I have Monday to Thursday off, finish fuel system, wire fuel system, air lines roughed in, I'm building sturdier mounts between
chassis and frame, not bolted through plywood. Welding in additional 1x2 aluminum tube above original frame tabs and will drill and
fully isolate the two. Some aluminum sheets need to be modified and built, and cut and fit insulation. Hopefully by Thursday I can
be at least start cutting plywood.
Also need to fix my exhaust. The 2 1/2 to the back is good but rest is not. Picked up new walker ball flanges and am just going to
build a y pipe to it with no mufflers at the front. I'll add something to the rear for a muffler if it's to noisy.
Black /grey water tank coming along, need to cloth the interior and glue it together yet.
--
Bill
_______________________________________________
GMCnet mailing list
Unsubscribe or Change List Options:
http://temp.gmcnet.org/cgi-bin/mailman/listinfo/gmclist
Regards,
Rob M. (USAussie)
The Pedantic Mechanic
Sydney, Australia
'75 Avion - AUS - The Blue Streak TZE365V100428
'75 Avion - USA - Double Trouble TZE365V100426
|
|
|
|
| Re: [GMCnet] TZE167V102169 on road soon! [message #240929 is a reply to message #240919] |
Sat, 22 February 2014 23:24 |
Ken Burton
Messages: 10030
Registered: January 2004
Location: Hebron, Indiana
Karma: 10
|
Senior Member |
|
|
| USAussie wrote on Sat, 22 February 2014 21:31 |
Bill,
Re the exhaust: It has been noted here before that not having mufflers is not a problem for those in the GMC; however, it's not nice
for people outside the coach.
Regards,
Rob M.
Sydney, Australia
AUS '75 Avion - The Blue Streak TZE365V100428
USA '75 Avion - Double Trouble TZE365V100426
-
Also need to fix my exhaust. The 2 1/2 to the back is good but rest is not. Picked up new walker ball flanges and am just going to
build a y pipe to it with no mufflers at the front. I'll add something to the rear for a muffler if it's to noisy.
Bill
|
I tried the no muffler thing once when converting to a single rear muffler. I removed the front mufflers and welded in straight through pipes. Before cutting the rear pipe I gave it a try and it was loud, loud, loud.
I had Laurie drive the coach down taxiway Alfa at our airport to the other end which is 5000 feet away. I could hear the coach when she started back towards me which was a mile away. We have 7000 feet on that taxiway but I figured if I could hear it a 5000' why bother testing it at 7000'. On went the rear Flowmaster and that fixed the problem.
Ken Burton - N9KB
76 Palm Beach
Hebron, Indiana
|
|
|
|
|
|
|
|
| Re: [GMCnet] TZE167V102169 on road soon! [message #241223 is a reply to message #241206] |
Mon, 24 February 2014 19:43 |
Ken Henderson
Messages: 8726
Registered: March 2004
Location: Americus, GA
Karma: 9
|
Senior Member |
|
|
Thanks, Bo. I'd been dreading moving the pumps off of the frame rail when
I install Albert's SS brake cables. Now I know how to do it easily.
Ken H.
Americus, GA
'76 X-Birchaven w/Cad500/Howell EFI & EBL
www.gmcwipersetc.com
On Mon, Feb 24, 2014 at 8:12 PM, Bill Dolinsky wrote:
>
>
> Did some shopping, air tubing and wire, some fiberglass supplies. Little
> work on crap tank and it warmed up to a sunny -10c. might go Back out
> tonight do some sanding on the poop tank so I can finish insidestomorrow morning.
> Got fuel module done and sending units in at least . Plumb the rest
> tomorrow.
>
> http://www.gmcmhphotos.com/photos/1977-gmc-kingsley/p52915-fuel-module.html
>
> --
> Bill Dolinsky
> Edmonton, Alberta, Canada
> 1977 Kingsley TZE167V102169
> _______________________________________________
> GMCnet mailing list
> Unsubscribe or Change List Options:
> http://temp.gmcnet.org/cgi-bin/mailman/listinfo/gmclist
>
_______________________________________________
GMCnet mailing list
Unsubscribe or Change List Options:
http://temp.gmcnet.org/cgi-bin/mailman/listinfo/gmclist
Ken Henderson
Americus, GA
www.gmcwipersetc.com
Large Wiring Diagrams
76 X-Birchaven
76 X-Palm Beach
|
|
|
|
|
|
| Re: [GMCnet] TZE167V102169 on road soon! [message #241285 is a reply to message #241230] |
Tue, 25 February 2014 08:07 |
Ken Henderson
Messages: 8726
Registered: March 2004
Location: Americus, GA
Karma: 9
|
Senior Member |
|
|
Bill,
Sorry 'bout the "Bo" -- guess I was still "under the influence" after
surgery.
Sounds like a PO has "improved" your vent system. I'd take it back to the
OEM configuration shown in the manual, with the possible exception of
doubling the "purge" line to the filler neck.
Ken H.
On Mon, Feb 24, 2014 at 9:03 PM, Bill Dolinsky <Wildbillnick@yahoo.com>wrote:
>
>
> Existing frame holes, 1/4 X 6 was the only bar I had laying around except
> oft the 1/8" the fuel solenoid is on. Just above frame rail, see about
> doing skid
> Plate. Po work? Highest outlets on tank, not on sending unit are tied
> together with a raised loop. I would think these locations would be better
> tied to filler neck vent?
> --
>
_______________________________________________
GMCnet mailing list
Unsubscribe or Change List Options:
http://temp.gmcnet.org/cgi-bin/mailman/listinfo/gmclist
Ken Henderson
Americus, GA
www.gmcwipersetc.com
Large Wiring Diagrams
76 X-Birchaven
76 X-Palm Beach
|
|
|
|
|
|
| Re: TZE167V102169 on road soon! [message #241963 is a reply to message #236824] |
Sat, 01 March 2014 22:13 |
|
WildBill
Messages: 232
Registered: January 2014
Karma: 1
|
Senior Member |
|
|
So I canceled my order with Applied for the reaction arm drum brake system. I wasn't aware of Mannys disk brake system, must of over looked it or assumed all the disk systems were in the $1600 to $3000 range once you added the reaction arms. Thanks to all of you that made me aware. I prefer disk brakes, even at $1000 I would have been looking at wheel cyls, shoes, hoses, rebuild backing plates, perhaps drums etc. I understand the park brake isn't fantastic and I'll look at ways to improve that. I have a free Mico Lock I'll throw fresh o rings in and find a nice set of hopefully free wheel chocks, perhaps assisted park brake apply. the Applied representative was really nice to deal with as far as cancelling the order, I'm sure there are things that I will have to order from them in the future and while I know of many other options for suppliers now should I need to buy from Applied I know the price up front and I can now shop for my best deal for me. So for starters Manney rear disks reaction arm setup with the front tracking arm and a one ton front end. I think even though this thing is stripped out at this moment it should start with a solid foundation.
[Updated on: Sat, 01 March 2014 22:18] Report message to a moderator |
|
|
|
|
|
| Re: TZE167V102169 on road soon! [message #243210 is a reply to message #236824] |
Wed, 12 March 2014 18:25 |
|
WildBill
Messages: 232
Registered: January 2014
Karma: 1
|
Senior Member |
|
|
Sully type airbag system, 1/4" X 3 square tube. Normal ride height, went 3/4" nf just because. Plumb later with shut off, when I do the brake work.
http://www.gmcmhphotos.com/photos/member-galleries/p53588-sully-type-airbag.html
Floor in, progress! Left a sheet off to show the Durafoam 1" insulation. G1S 3/4 fir sealed edges and bottom so far with aluminum industrial enamel. gmc didn't go that far and most looked fine.
http://www.gmcmhphotos.com/photos/member-galleries/p53589-floor-in.html
Oh, picking up a 455 Saturday, says 68000 miles,weel see. Set of A heads included. If any one wants a 72. Caddy with the horse shoe mount get back to me. Decided not to do caddy. Good line on 454 vortec, doesn't
Oort that tough to me. Might just buy it because, ski boat spare, next boat, 455 just to easy but 454 already roller cam.
[Updated on: Wed, 12 March 2014 18:46] Report message to a moderator |
|
|
|
| Re: [GMCnet] TZE167V102169 on road soon! [message #243215 is a reply to message #243210] |
Wed, 12 March 2014 18:49 |
dwayne jacobson[1]
Messages: 345
Registered: July 2009
Karma: 0
|
Senior Member |
|
|
seeing the progress you are making you might just have it on the road to
drop sown and pick us up in Montana as we head east to Detroit. Last week
in May.
Warming trend is on its way to the Big E.
Regards
Dwayne jacobson (ex-edmontonian)
77 Kingsley
On Wed, Mar 12, 2014 at 4:25 PM, Bill Dolinsky <Wildbillnick@yahoo.com>wrote:
>
>
> Sully type airbag system, 1/4" X 3 square tube. Normal ride height, went
> 3/4" nf just because. Plumb later with shut off, when I do the brake work.
>
> http://www.gmcmhphotos.com/photos/member-galleries/p53588-sully-type-airbag.html
>
> Floor in, progress! Left a sheet off to show the Durafoam 1" insulation.
> http://www.gmcmhphotos.com/photos/member-galleries/p53589-floor-in.html
>
> --
> Bill Dolinsky
> Edmonton, Alberta, Canada
> 1977 Kingsley TZE167V102169
> _______________________________________________
> GMCnet mailing list
> Unsubscribe or Change List Options:
> http://temp.gmcnet.org/cgi-bin/mailman/listinfo/gmclist
>
--
Dwayne Jacobson
White Rock BC
Cell: 604-644-8090
_______________________________________________
GMCnet mailing list
Unsubscribe or Change List Options:
http://temp.gmcnet.org/cgi-bin/mailman/listinfo/gmclist
|
|
|
|
Goto Forum:
Current Time: Fri Sep 27 06:04:06 CDT 2024
Total time taken to generate the page: 0.05678 seconds
|
 GMCforum